Monday, May 23, 2011

Planner


This is my life.


Well, it helps me organize and stay on top of things in my life, anyway. When I was in college I depended on a handheld planner to keep track of everything and write my checklists in. I've tried a few times since becoming a mom to use them, but it just hasn't worked for me. The thing I've found that does work for me is making lists and putting them on my fridge. So I decided to make this poster of all my lists. I used scrapbook paper, doublestick tape, glue, and my Silhouette SD. Then I got it laminated so I can use visavis markers to write on it and cross things off and then wipe it and do it again. It has my weekly menu, shopping list, cleaning lists, daily tasks, weekly tasks, monthly tasks, goals, phone #s, reminders and notes sections. This is made specifically for me, so you wouldn't want to copy it exactly, but do what works for you. I am sure this is not magically going to make me on the ball all the time, but it will help. ;)

Tuesday, May 17, 2011

List of Summer Fun

I saw the idea for this here: http://thecraftingchicks.com/2011/05/summer-fun-chart-and-photo-journal.html. But I have seen similar ideas other places in past years. I didn't use her download, but it is free if you want to use it. I decided to do my own thing and instead of printing it poster size from somewhere I just printed it on an 8.5 x 11 at home. I don't know if we will really do ALL of these things this year, but it gives us some fun ideas.

Monday, May 16, 2011

Lenabug

I got a Silhouette SD for Mother's Day and I am so excited! This was my first real project using it and I LOVE it! I bought a shirt for a couple dollars to go with some pajama pants I intended to make for Lena. When I got the silhouette SD I decided it needed some embellishing. :)


Here is the plain yellow shirt.


I used the Silhouette SD to make a freezer paper stencil. Just find the image you want, size it, use the silhouette to cut it out, then iron it onto your project.


Then I used purple fabric paint and painted in the stencil. It doesn't need to be neat because when you pull off the freezer paper it will make all your edges beautiful.


Let is dry. Then pull off the freezer paper.


Voila!


And I made her some pajama pants to go with it. So stinkin' cute. I had a lot of fun doing this shirt and it was really easy. I am excited to do more with my new toy!

Tuesday, May 10, 2011

Grocery Bag Holder/Dispenser

I'm one of those people who keeps a lot of their grocery bags to use later for garbage can liners and other things. They come in handy sometimes. But we had so many and they were just shoved in our cupboards and getting a little out of hand. So when I came across this tutorial- http://www.makeit-loveit.com/2009/01/grocery-bag-holder.html, I thought it was genius.


You can stuff the grocery bags in at the top and pull them out at the bottom because the opening is bigger on top.


Since I don't have a pantry to hide it in I wanted it to be cute and match my kitchen. My kitchen is decorated in cherries and you may even recognize this fabric because I used it before to make some hotpads and embellish a towel for my kitchen. The tutorial for this is very easy to follow and doesn't take much time to make. I added some rick rack and buttons for extra cuteness.

Sunday, May 8, 2011

Picture Magnet Tiles

This photo is terrible. The glass tiles and flash didn't go well together and I only took one picture of them. Just take my word for it, they turned out really cute. Anyway, these are a few photo magnets that my 3 year old and I made together. We used glass tiles, mod podge, magnets, and pictures of the kids. We sized the pictures so that they were the size of the tiles and printed them. Then we cut them out and mod podged them to the tiles. Then we added little magnets to the back so we could put them on the fridge. Landon really enjoys helping me with projects and this was a fun one to do together.

Tuesday, May 3, 2011

Zipper Pouch

I saw this tutorial - http://tatertotsandjello.blogspot.com/2011/04/guest-project-make-zippered-pouch-with.html and wanted to try it. It was pretty easy and turned out cute. I think I will do another one or more in the future.


I used a 7 inch white zipper, brown/aqua print fabric for the outside and a white fabric for the lining.

Friday, April 8, 2011

Easter/Spring Dress

This is another dress that I halfway made up. The half that I followed a pattern for was the top. This is the pattern I used.


Whenever I make things up there are always things that I would do differently if I were to do it over, but hey you live, you learn. I think it turned out pretty well.


I am in love with the fabrics. And actually, Aaron is the one that spotted them when we were at the fabric store. He just knows me so well. Butterflies, sparkles, pretty colors- what's not to love?


I wanted it to have plenty of ruffles, which is why I chose this particular pattern for the top.

And as an afterthought I added a little rosette to the front. I just hope Lena doesn't tear it off.
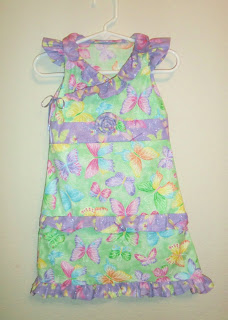


The thing that I would change if I were to do it over is to make the ruffles on the skirt bigger and the first ruffle on the skirt higher us. I made them to be the same size as the ones on the neckline, but I think that on the skirt they would look better bigger. So, basically I would make the skirt more ruffly. But I am still pretty happy with it. I can't wait to put it on Lena. I will add pictures of her in it, if she will hold still well enough for me to take any. :)