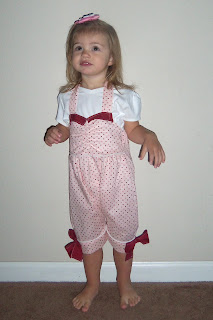
I am so excited about this new romper I made for my daughter! I love all the rompers I have been seeing around the blogosphere, so I decided to come up with one of my own.
 I found some fabric that I had been given a while back. I know some people may think the fabric is a little much, but I totally love it. I got a pair of Lena's pants that were a good length on her and loose enough for movement (some PJ pants). I laid them out on the fabric.
  I cut around the pant leg making sure to leave enough for the seams and hem. I measured Lena's torso and extended the piece that much on the top, making sure to leave enough for the seams and top casing.
 Then I used that as a pattern to cut the second piece, just like it.
 Then I measured how far down on Lena I wanted the arm holes to go (4 inches), and I cut those out.
 Then I unfolded the two pieces and laid them on top of each other right sides together. Then I pinned them along the front and back seams and sewed them.
 Once those were sewn I pressed the seam open, unfolded the piece and pinned the leg seams and sewed them.
 Then I clipped, turned and pressed the arm holes.
 And sewed them down with two lines of stitching.
 This is what it looked like at that point.
 Then I turned down the top front to create a casing (1/4 inch then 1 inch) and stitched two lines. Then I did the same thing to the top back.


